HOW TO GUIDE


All you need to know about BACnetP2

Are you a bit unsure as to how to install BACnetP2? Or how to get the reports needed for pricing? Or maybe you need P2 backup files and don't know where to start. This is a how-to guide for our BACnetP2 gateway, that will hopefully answer your questions. It is made up of a series of how-to articles which will be added periodically. All of this information is contained in our BACnetP2 user guide which is available from our BACnetP2 Downloads page.


Contents

PART 1: HOW TO GET INSIGHT REPORTS

PART 2: HOW TO INSTALL BACNETP2

PART 3: HOW TO GENERATE PANEL BACKUP FILES

PART 4: BACNETP2 DEPLOYMENT PROCESS

PART 5: HOW TO WORK WITH TECS

PART 1: HOW TO GET INSIGHT REPORTS


Siobhan Noffke 28 Feburary 2022

We decided that it was fitting for us to start this series of articles where most people start on their journey with BACnetP2: Insight Reports. BACnetP2 pricing is based on the configuration of the existing P2 system. In order for us to give you a quote for the system you want to integrate, we need two reports: System Profile Report and Panel Configuration Report. These can often cause delays, as it is sometimes not possible to retrieve these reports remotely. You may also not be sure how to get these reports. We have put together a very simple, step-by-step guide to help you generate these reports. If you would like this in a document format that you can download, please go to our BACnetP2 Pricing page.

You don’t have to do anything other than send us the reports, we will go through them and count the devices to give you a quote.

These instructions show you how to run the System Profile Report and the Panel Configuration Report. Aside from selecting the type of report to run and naming the files, the instructions are the same for both reports. In our example, we are going to run the System Profile Report first.


Start on the Insight PC desktop.

1) Opening the Report Builder: The first step is to locate the Insight toolbox and press the Report Builder icon to open it.

Please note that it may also look like this:

2) Create a new Report: Open a new report by clicking on Definition and then clicking New.

3) You are now going to select the type of report you want to run. Select the System Profile Report, then press OK.

4) Press the Configure button.

5) Check the File option, then press the file options button.

6) Press the Output file button. We suggest saving the report to your Desktop so you can find it easily.

7) Enter a filename for the report and then press Save. We suggest SystemProfileRep.csv

8) Close File Options and then close Report Output Options

9) Now press Run Report.

10) Allow the report to generate (this may take several minutes). Once the report has generated then close.

11) Close the System Profile Report.

12) Now you can run another report.

Your report will be on the desktop (if you saved it there).


**Remember that we need you to run both reports, and send us both so that we can give you a quote.**

13) Create a new Report: Open a new report by clicking on Definition and then clicking New.

14) You are now going to select the type of report you want to run. Select the Panel Configuration Report, then press OK.

15) Press the Configure button.

16) Check the File option, then press the file options button.

17) Press the Output file button. We suggest saving the report to your Desktop so you can find it easily.

18) Enter a filename for the report and then press Save. We suggest PanelConfigRep.csv

19) Close File Options and then close Report Output Options

20) Now press Run Report.

21) Allow the report to generate (this may take several minutes). Once the report has generated then close.

22) Close the Panel Configuration Report.

23) Now you can close the Report Builder, or run another report.

Your report will be on the desktop (if you saved it there).


PART 2: HOW TO INSTALL BACNETP2


Siobhan Noffke 09 March 2022

This is the second part in our how-to series, and it is a step-by-step guide to install our BACnetP2 gateway. This is included in the BACnetP2 User Guide which can be found on our BACnetP2 Downloads page. You can follow this guide and install it yourself, or we could install it for you. When you buy a BACnetP2 licence, it comes with 1-year remote support included. You can also buy a Linux device with BACnetP2 pre-installed if you prefer. If you would like to do that, you can contact our hardware supplier from our Partners page. Since you are here reading a guide on how to install BACnetP2, we will assume you want to install it yourself and jump right in.

Download:

BACnetP2 comes as an Ubuntu package that needs to be installed in the Ubuntu operating system. Download the latest package here

Steps:

Step 1: Setting the Time and Date if installing on a remote network without an internet connection
Due to the BACnet protocol, the devices on the BACnet network including the P2 Driver will need the same date and time accurate to about 5 min -+ to operate correctly.

To view the current time use the command:

$ date
Tue Aug 31 12:14:22 SAST 2021
$

To set the time use the command:

$ sudo date -s "31 AUG 2021 12:17:00"
Tue Aug 31 12:17:00 SAST 2021
$

Step 2: Install the Gateway
Copy the Ubuntu package to the Home directory either using an USB flash drive or SSH file transfer.

Note: For SSH file transfer use FileZilla for SSH https://filezilla-project.org/ For SSH command line use PuTTy https://www.putty.org/

To install, navigate to the location of the package and type in the following in the command prompt. “sudo dpkg -i pkg_bacnet_p2.deb”. The P2 gateway will install and immediately start running as a service.

$ sudo dpkg -i pkg_bacnet_p2*.deb
[sudo] password for derek:
(Reading database ... 155172 files and directories currently installed.)
Preparing to unpack pkg_bacnet_p2-2.0.0.14-RC5.deb ...
Unpacking bacnetp2 (1.1) over (1.1) ...
Setting up bacnetp2 (1.1) ...
$

Step 3: Explore the Network
To locate the BACnetP2 gateway on the network, send a “who-is” command with any BACnet explorer program to explore the network. The P2 gateway will appear as device address 2600000 as the device name on the network.

Step 4: View the Status of the Gateway
Scripts can be used to start, stop and show the status of the P2 Gateway.

The following command will show the status of the P2 Gateway:

$ sudo systemctl status bacnet_p2

To Stop the P2 Gateway the following command can be used:

To Start the P2 Gateway the following command can be used:

$ sudo systemctl start bacnet_p2

PART 3: HOW TO GENERATE PANEL BACKUP FILES


Siobhan Noffke May 2022

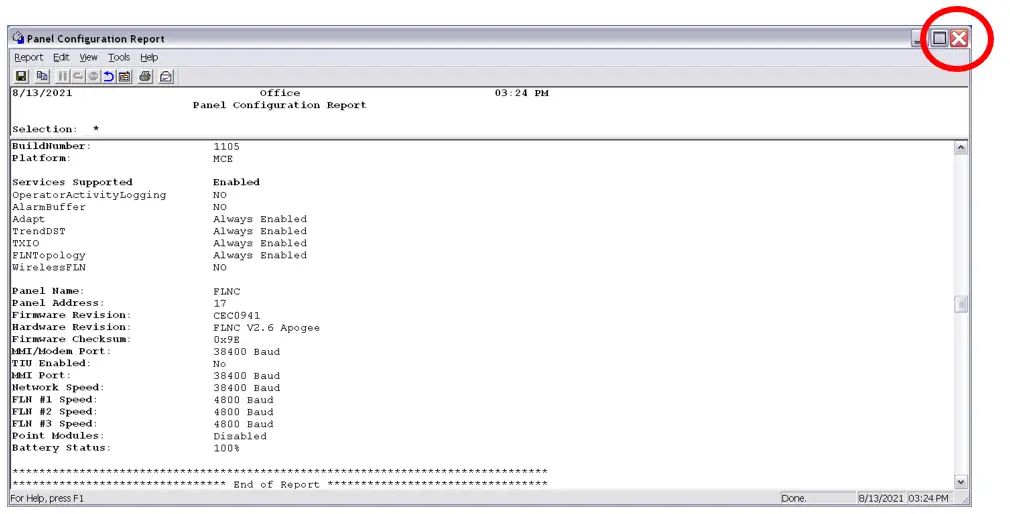
This is the third part in our how-to series, and it is a step-by-step guide to generate the panel P2 backup files. This is included in the BACnetP2 User Guide which can be found on our BACnetP2 Downloads page. We rely on the Insight PC to provide the Apogee panel database backup files. Once we have these files installed on the BACnetP2 gateway then we are able to restore any panel database as may be required.
This manual process involves 5 steps.
1) (Optional) Ensure that Insight has the latest copy of each panel database.
2) Generate the panel P2 backup files.
3) Rename the P2 backup files ready for BACnetP2 use.
4) Transfer the backup files to the BACnetP2 data folder.
5) (Optional) Verify that correct files are installed on BACnetP2.

1. Ensure that Insight has the latest copy of each panel database

This is an optional step. Sometimes the technician has directly updated the panel database, in which case the Insight database may be out of sync with the panels. The following steps will ensure that the Insight database and the panel databases are the same.


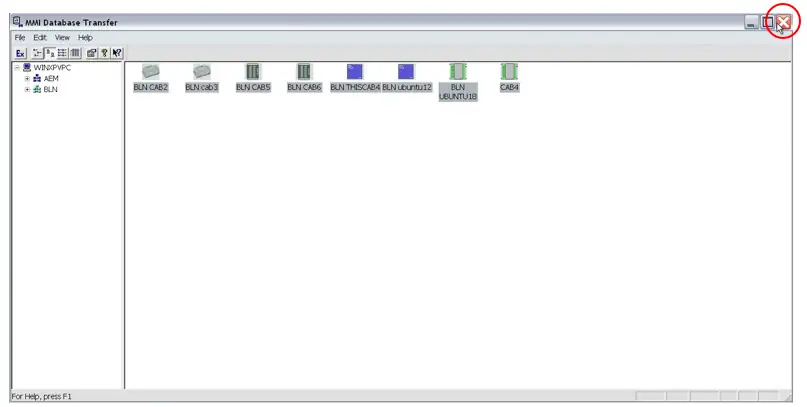
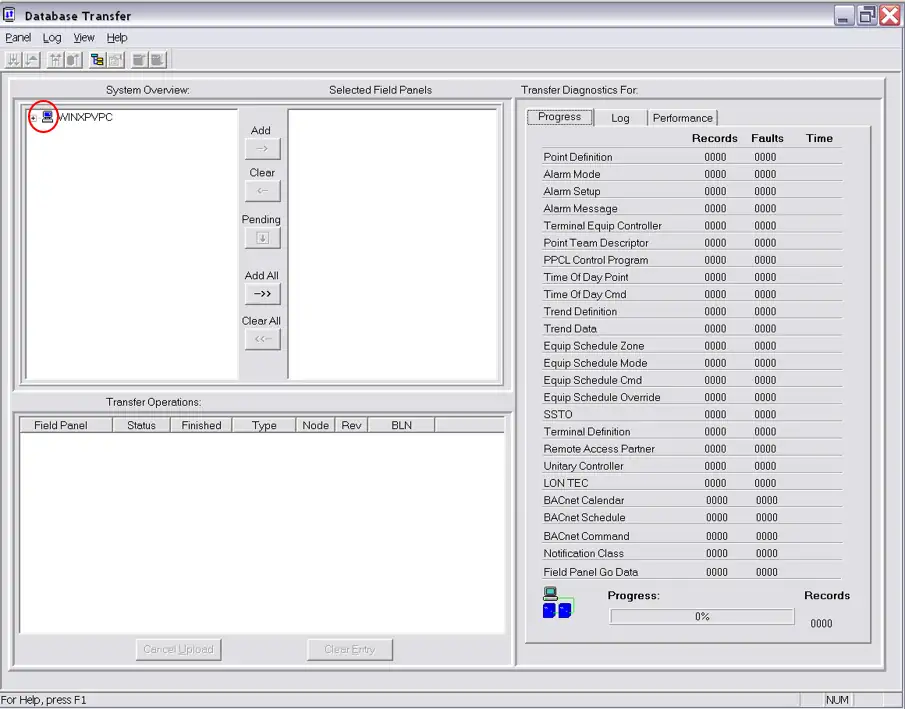
On the Insight PC select the “Database Transfer” utility.


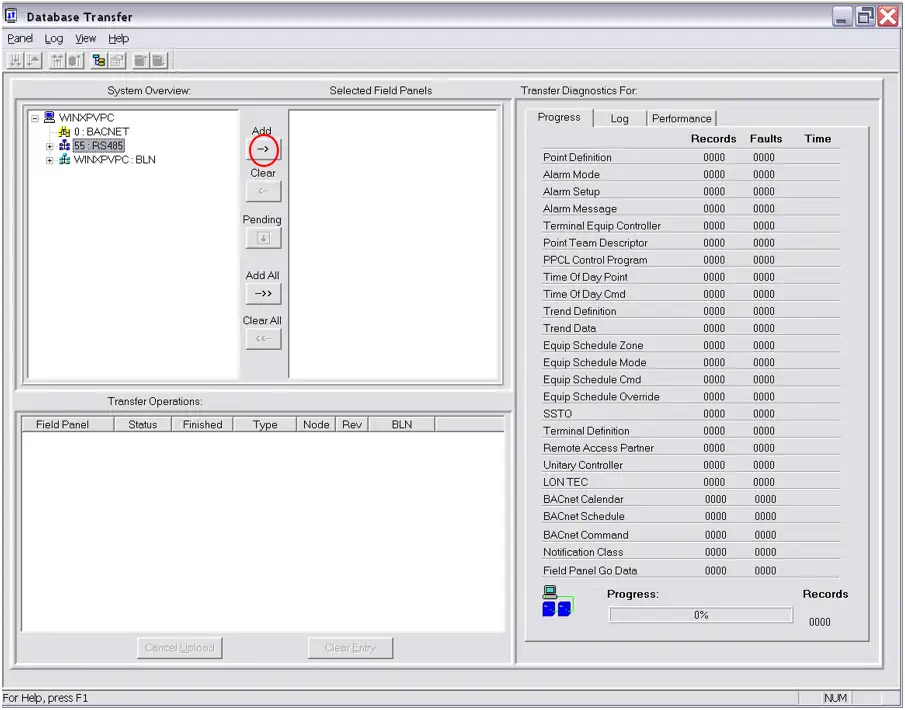
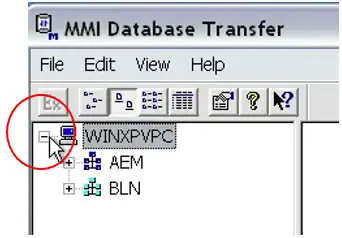
Expand the tree to show the BLNs.


Select all required BLNs and then press the “Add” button.


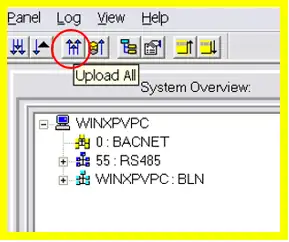
Once all the required panels are listed as “selected field panels” press the “Upload All” button.
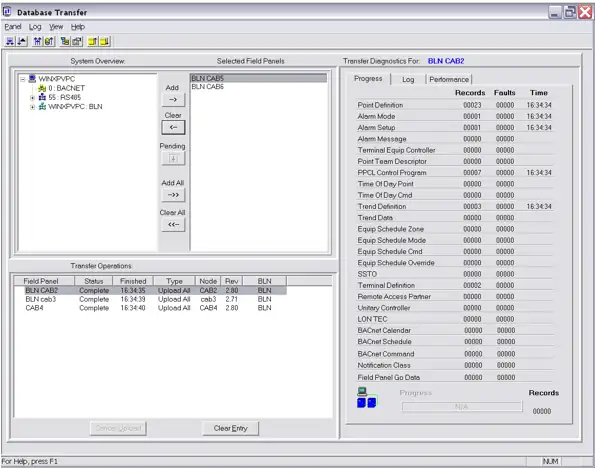


Press OK


Wait until all transfers are completed.


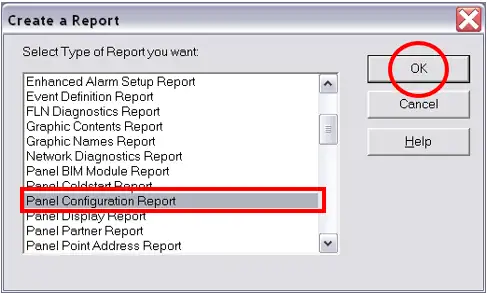
2. Generate the panel P2 backup files.

Open the “MMI Transfer utility”


Expand the device tree to reveal the BLNs


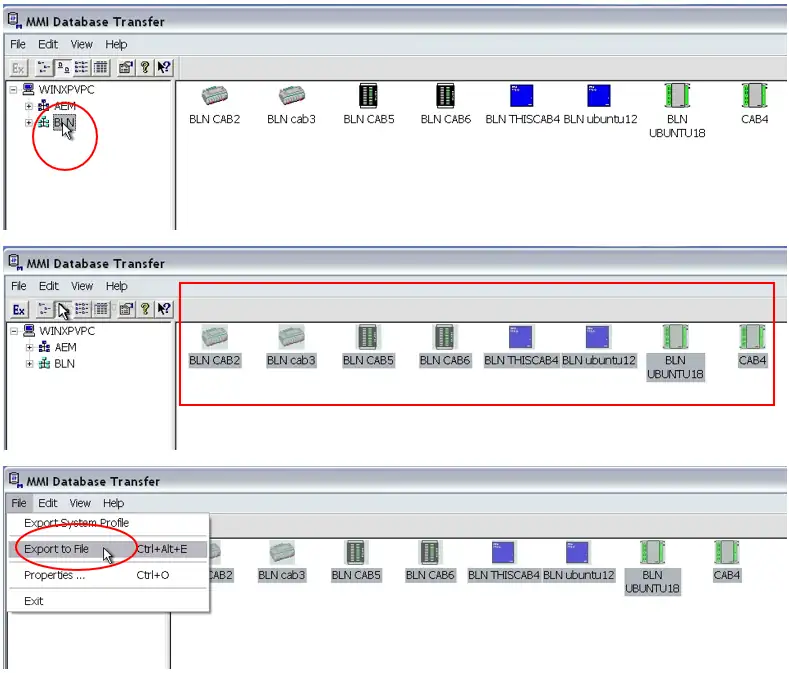
Select the 1st BLN by clicking on the BLN name in the left side.


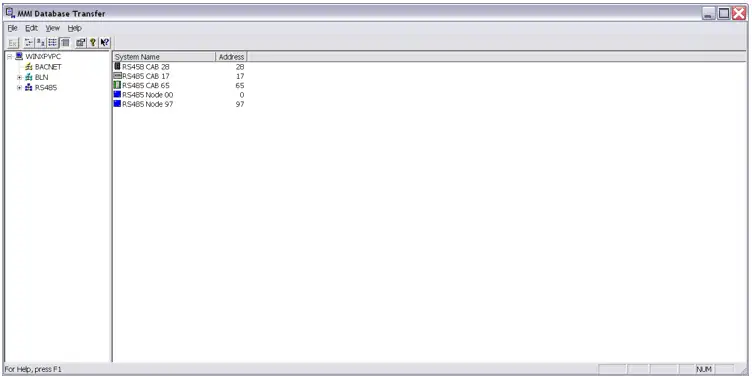
NB: For RS485 BLN field panels, we need to know the drop address. Usually the Panel name indicates the drop address. For example “Node 3” would be address 3, however this is NOT always the case.


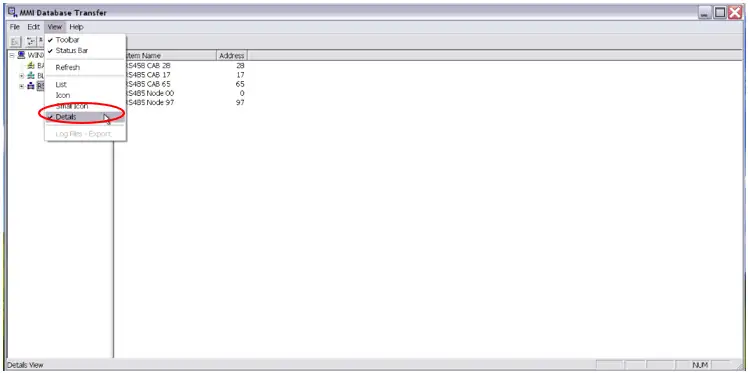
Select “Details” in the “View” menu to reveal the field panel addresses.


Make notes, as required, of any field panel names where the address is not obvious.


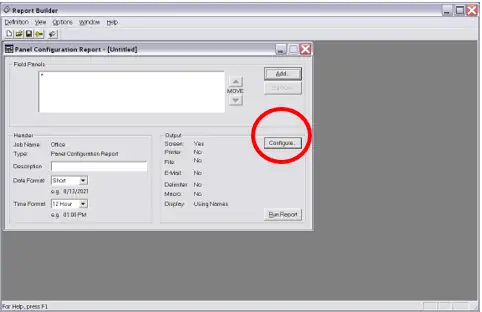
Select all the panels for this BLN using the “Edit” menu.


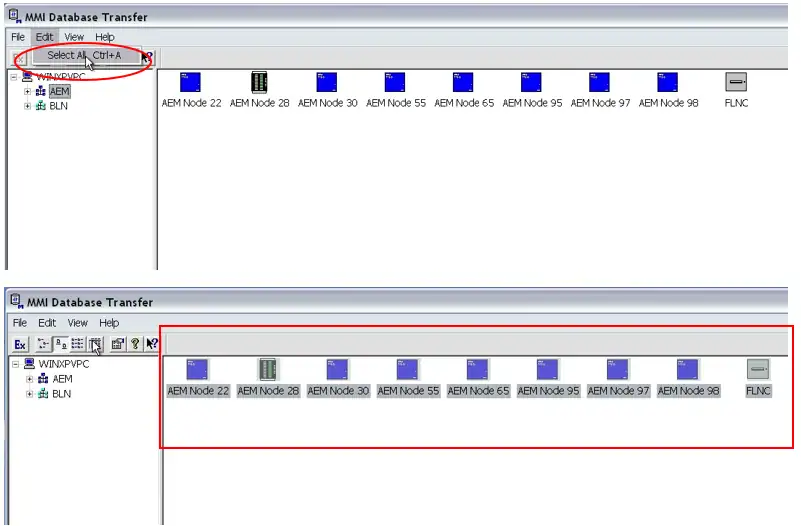
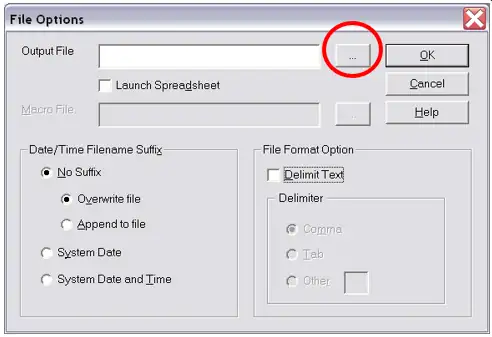
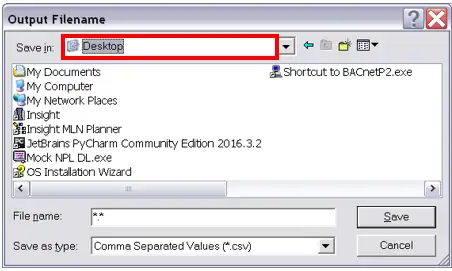
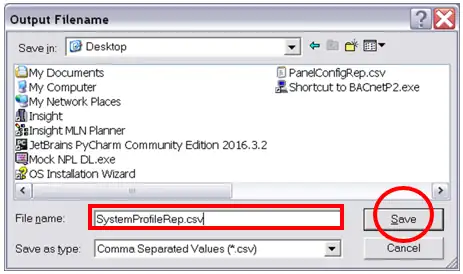
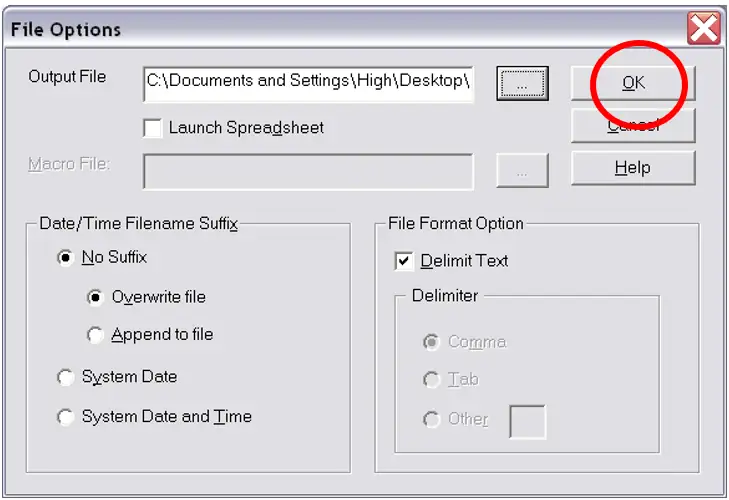
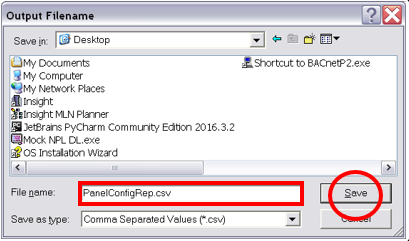
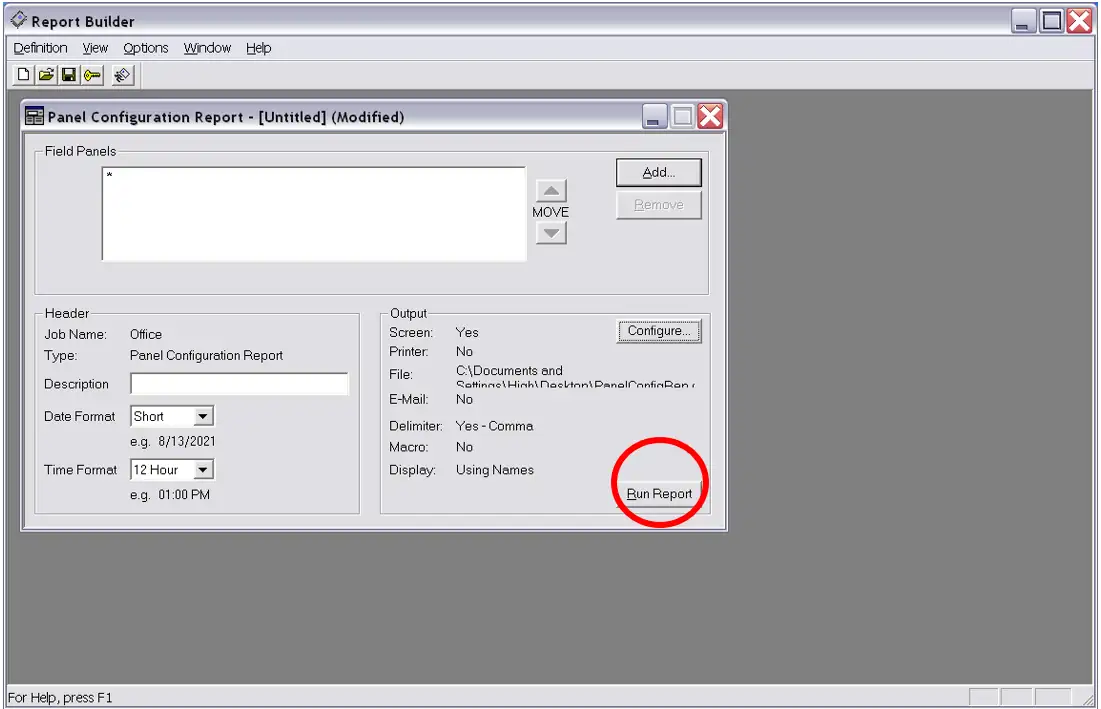
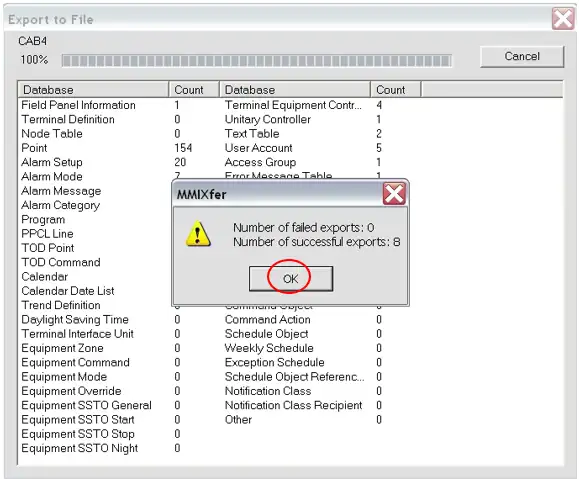
Now open the “File” menu and select the “Export to file” option.


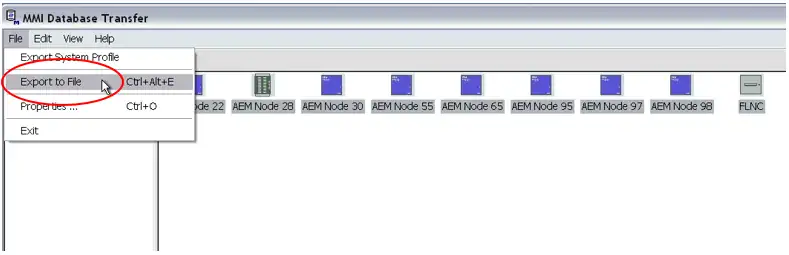
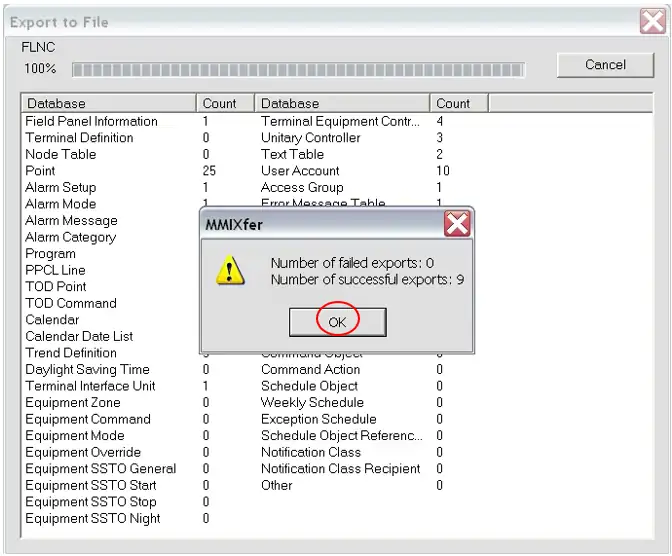
The export may take several minutes.


Now repeat this process for each of the remaining BLN


Now close the “MMI Database Transfer” utility.


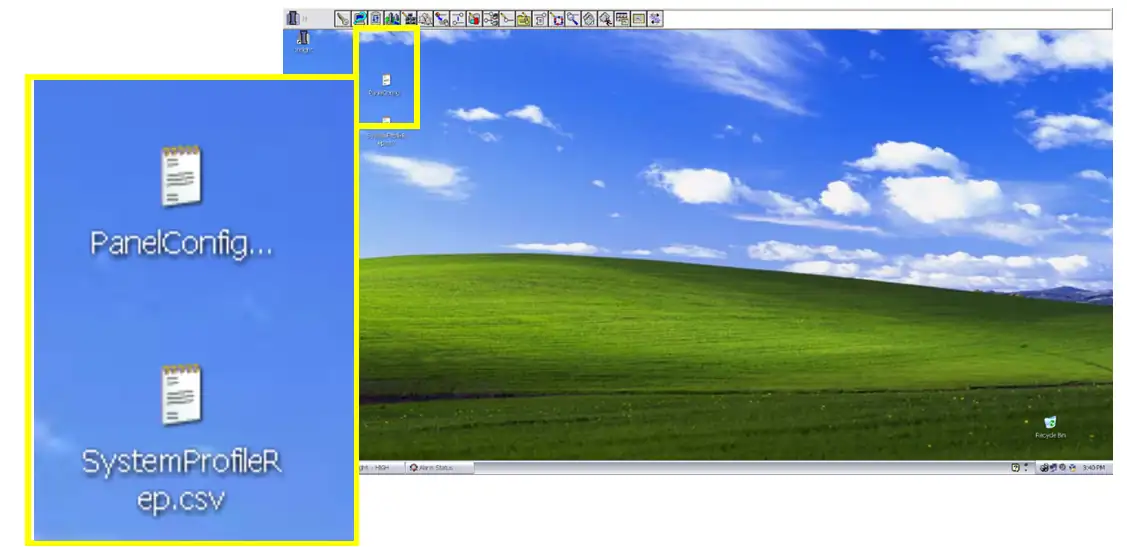
Now we need to locate the Insight export folder so we open the “file explorer”


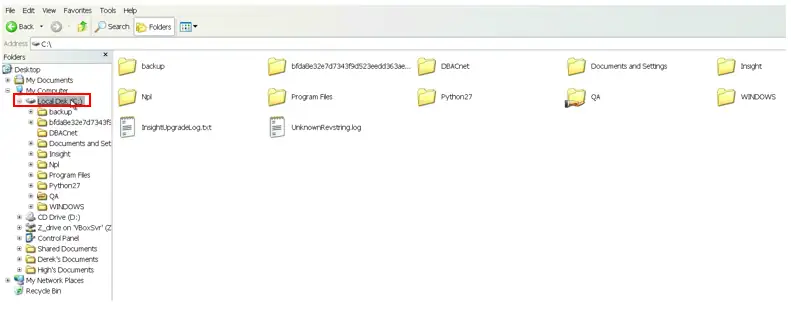
Select the “Insight” folder, usually C:\Insight


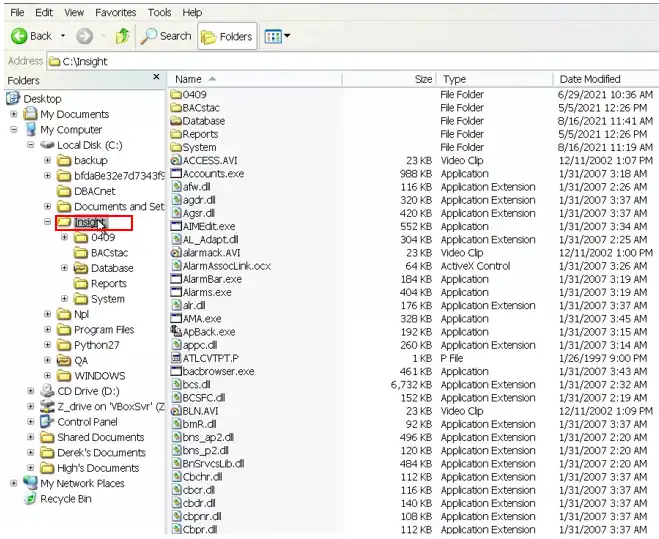
Select the “Database” folder, usually C:\Insight\Database


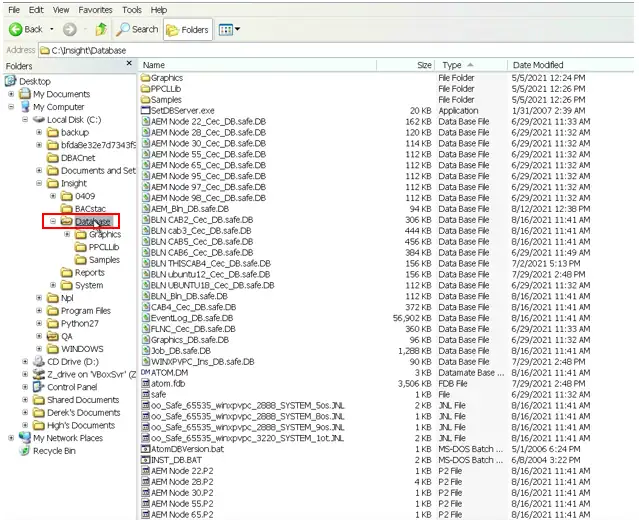
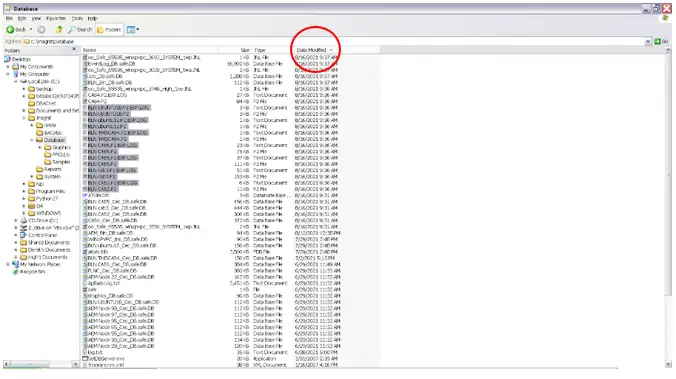
If you sort the list by “Date Modified” you should see the exported backup files.


Once you have located the files you can group them by sorting on “Type” as shown.


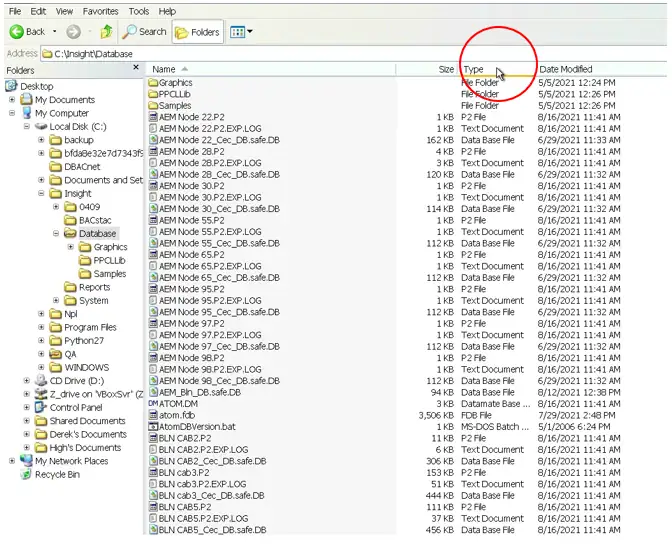
Select all the .P2 and the .EXP.LOG files and then send them to a “compressed (zipped) folder” as shown.


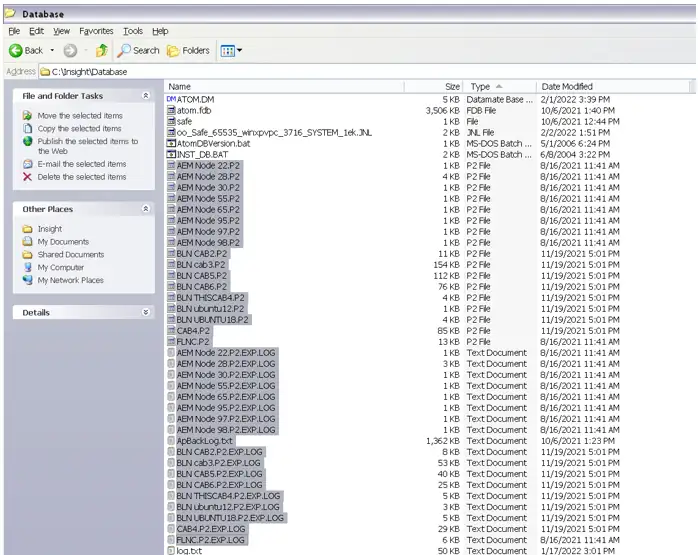
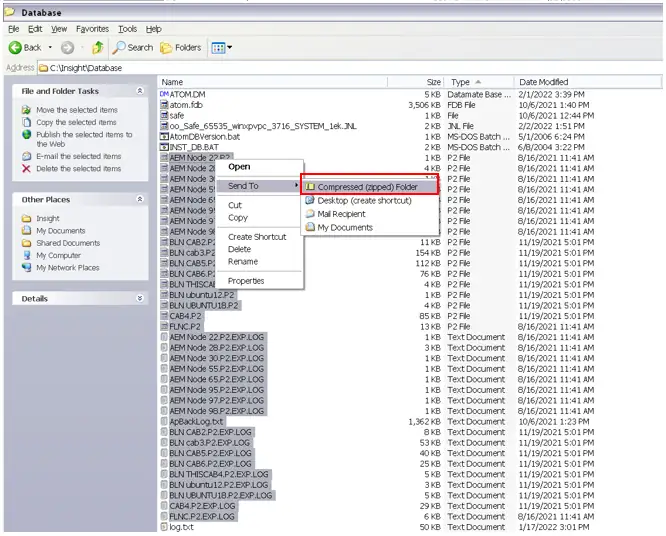
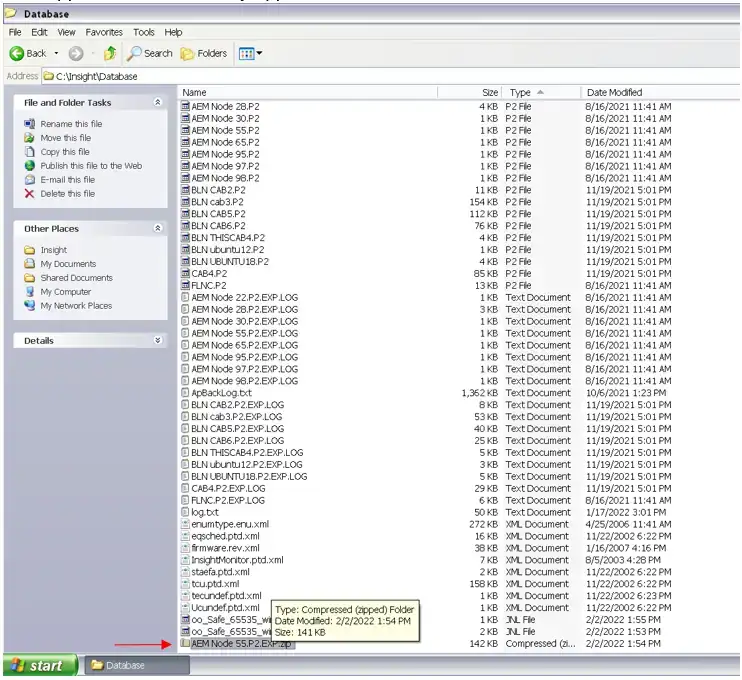
The Zipped folder will usually appear at the bottom of the list.

Please send this zipped file to PurpleSwift at info@purpleswift.com or continue to the next section.


3. Rename the P2 backup files ready for BACnetP2 use

Lookup the BACnetP2 assigned “panel number” for each panel. For RS485 panels this is the drop address. For Ethernet panels this is the last number in the panel IP address.
So panel on IP 192.168.1.99 = “panel number” 99

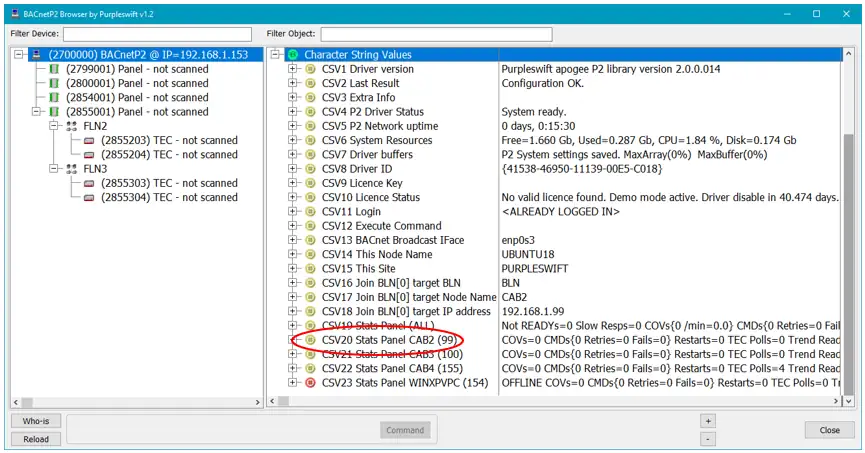
In the screenshot below you can see the “panel number” shown. “CSV20 Stats CAB2 (99) …” 99 in this example.

Rename the panel backup files to the BACnetP2 naming scheme: (00)_DMxxx.P2
Where xxx is the 3 digit “panel number” so 099 in our example.

(00)_DM099.P2


4. Transfer the backup files to the BACnetP2 data folder

Use SSH to transfer the backup files to the BACnetP2 data folder. We use Filezilla to do this. The data folder is located here: /var/lib/bacnet_p2/data


5. Verify that correct files are installed on BACnetP2

To verify a panel backup file use CSV12 – Execute Command. Watch CSV4 for the progress, and CSV2 and possibly CSV3 for the results.

On a RS485 BLN the verify command is: verify nn
Where nn is the panel drop address.

On an Ethernet BLN the verify command is: verify xyz
Where xyz is the panel node name.


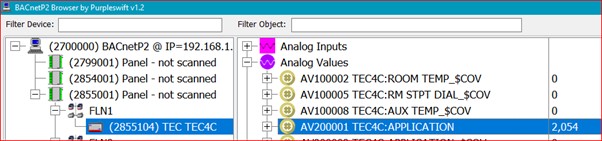
How to detect that a panel has lost its database

If you are wondering how to tell if a panel has lost its database then take a look at the panel stats. See the screenshot above.
The global count (“Stats Panel (ALL)”) gives the number of panels that are “Not READY” which indicates a lost database. The individual panel stats will be prefixed with “Not READY” if the database is lost.


PART 4: BACNETP2 DEPLOYMENT PROCESS


Siobhan Neethling 08 Feb 2024

This is the fourth part in our how-to series, an explanation of the BACnetP2 deployment process. This details each step from purchase order to the deployment being complete. A PDF version of the image below can be found below which includes links to schedule meetings. This is the process that is followed when hardware is supplied by our hardware supplier.


Steps:

1: Purchase order received by dealer: You can find our dealers here: Distributors

2. Request device configuration data: The dealer will request the following information

  • IP address
  • Time zone
  • Contact details of the individual installing the device

3. Contractor provides config data: The information required for configuration MUST be provided before the device can be configured and shipped

4. Device is configured and shipped: The device will be configured and shipped within 3 working days of receiving the configuration data.

5. Send BACnetP2 deployment blueprint to installer: This BACnetP2 deployment process gets sent to the installer so that they know what the next steps are.

6. Schedule in-office setup meeting: A 20 minute in-office setup meeting must be scheduled with us.

7. Bench test device with contractor BMS: This is the in-office meeting where we help set up and bench test the device.

8. Schedule on-site installation meeting: A 2h on-site installation meeting must be scheduled with us.

9. Commission gateway, map complete system, discover devices and points on site BMS: This is the onsite commissioning of the gateway. It takes 2h for us to commission the gateway, map the complete system and discover devices and points on the system


Is Panel auto restore required?


10. If no then the deployment is complete


If Panel auto restore is required:


11. Contractor gets panel backups from the Insight PC

12. Schedule a 20 min technical support meeting

13. Transfer panel backup files to gateway and verify files are correct: This is the 20 min technical support meeting where we help you transfer the panel backup files to the gateway and verify the files are correct.

14. Deployment complete


If you require technical support or help after the deployment is complete, please schedule a 20 minute technical support meeting with us.


PART 5: HOW TO WORK WITH TECS


Siobhan Neethling 04 March 2024

This is the fifth part in our how-to series and it aims to give insight into some issues that are frequently run into when working with TECS, and our recommendations on how to deal with these issues. If you would like to download the user guide and read about how to work with TECs, you can do that here BACnetP2 Downloads.

Issues writing to TECs:

TEC’s are not that easy to work with so having the application notes is highly recommended. You can find the TEC application number in the TEC points list.

Downloading the application notes is usually as simple as searching the web for “Siemens application xxx”.

The application notes contain a table of the TEC subpoints as shown below.

The {nn} points are “unbundleable” and those that are outputs generally work as expected. The non “unbundleable” outputs are write protected by the panels.

You will NOT find any of these outputs as user settable points in the Insight GUI. In addition these points do NOT support the apogee priority settings (OPER, SMOKE…) but always report as NONE.

Some Insight users like to write to these outputs. This is achieved via the Insight “global commander” which allows writing to these points using the application number and subpoint number.

We have added support writing to these points which can be enabled via the gateway configuration BV “TEC Access Protected” option which once enabled allows writing from BACnet output slot 16 only (Priority NONE).

Our recommendation (see long explanation below) is to enable then write required values and then disable again.

The TECs save the info in an IC called an EEPROM which in the 1980’s only supported 10,000 writes before failure. The modern EEPROM supports 1,000,000 writes before failure. Our guess is that Siemens did not allow PPCL commanding of these values in order to protect the EEPROM. Using the global commander it would be very difficult to exceed the 10k write cycles of the EEPROM.

There is another reason that writing to these protected points is not recommended.

The point above is freely writable (does not get saved in EEPROM). If we set the value to an exact multiple of the point slope then all is good. For example if the unit is set to work in imperial units (Deg F) and we set the value to 77.5 then the panel will convert the 77.5 to the byte value 118 and write it out to the TEC. The TEC will then report a new value of 118 which the panel will valuate as 118 X 0.25 + 48 = 77.5, which provides no issues.

However if we set the value to 77.1 then the byte value of 116 will be written out to the TEC and when the value is read it will evalute as 77. If this is in a program loop then the program will re-write the value as 77.1 as fast as its control loop can manage, which is less than ideal. No damage is done but comms will be flooded with write commands which will slow everything down un-necesserily.

If this senario above was done on a protected point then the TEC could be destroyed within just a few hours. Recommendations

Senario 1

If we take the temperature setpoint as an example (application 2020). The TEC might be configured to operate as follows.

In this configuration we set the DAY.NGT point as required and the TEC copies the relevant setpoint to the CTL STPT point.
Should you require more control we recommend that instead of writing to the protected points you create your own DAY CLG STPT and NGT CLG STPT and then override the CTL STPT. In this way you avoid using the protected points.

Senario 2

Where a “once only” configuration is required then if the Insight PC is available simply use the Global Commander to set the values as required.


To use BACnetP2 to set the protected values our recommendation is to enable then write required values and then disable again.